Showing posts with label home. Show all posts

Sunday, March 3, 2013

Sarsaparilla Soda


No matter how hard I try to cut soda out of my diet, I just can’t help but grab one every once in a while!  So it might as well be homemade.

For the first time around I bought a couple soda extracts from my local brewery supplier, sarsaparilla and birch beer.  Which it turns out, both are basically just root beer, coming from different plants but similar in taste.


Recipe went as follows…

Rehydrate 1 tsp brewer’s yeast in warm water.
Combine soda extract, 4 lbs (or 8 cups) sugar with enough warm water to dissolve.

 
Stir in yeast and add warm water until you have 4 gallons of soda.

 
Fill bottles leaving 1-2 inches of head space.

 
Age 3-4 days at room temperature, then store in cool, dark place for total aging of 2 weeks
Refrigerate and enjoy! 
(My 4 gallons filled 28 12 oz. glass bottles and 2 2 liter soda bottles)

 
Can’t wait, it already tastes good, just needs to carbonate.

Tuesday, February 5, 2013

Brewing Beer

This Christmas my Dad and stepmom set me up with a complete beer making kit.  I thought about asking for one for Christmas but never did, they know me too well!  I had an American pale ale recipe for my first brew.  The kit had everything I would need already measured out, so it was a good way to start brewing. 

I’m just going to go over the basics to give you an idea of the process, because basically I just followed the recipe in my kit.  It was relatively simple and very rewarding! 

Cooking the Beer

First I poured the grain into a muslin bag and tied it shut, dropping it into 2 gallons of water.  Heat to 150°F, then reduce heat and let simmer for 30 minutes, draining grain bag occasionally to let all the flavors seep out.


Remove grain bag, bring to a boil then remove pot from heat and stir in malt extract syrup. 


Next add the hops, hops are added at different stages of the brew for different flavors. 

The first hops added are for bitterness, and then the beer is boiled for 45 minutes.

The next hops for flavoring, and boil another 15 minutes.

Another batch of hops is added for aroma, the heat is turned off and the brew sits for 10 minutes.

Remove hop bag and sit pot in sink filled with cold water until it cools to 100°F

 
Fermentation
 
Siphon or pour brew into primary fermenter and add yeast stirring to aerate mixture.


Cover fermenter and put out of direct sunlight and ideally between 65° and 75° F.

 
Within the next day the beer should foam up.
 
After 5 days I added more hops for a dry flavor.


In 6-8 days the foam should disappear, which means the fermenting is done


At this point I transferred my beer into my secondary fermenter (although a secondary fermenter isn’t necessary for lighter beers, it does make the beer more pure by not giving the yeast residue time to taint the flavor. Plus I wanted to learn how to use all my equipment.)


After 12-16 days the beer should be ready to bottle.  A hydrometer reading is taken to be sure fermentation is complete.  Apparently bottles can explode if fermentation is not complete!

Bottling

Bottling was easy. I siphoned the beer into a priming container with a spout.

 
Stirred in fermenting sugar, which is what creates carbonation, when the remaining yeast eats the sugar.

 Then siphoned the beer into bottles and capped them with a double lever capper.

 
Pale Ales are good to go 2 weeks after bottling, but best after 3 weeks. 

Saturday, November 10, 2012

Chicken Coop Addition and the Adventures of Integrating a New Hen


What a busy month it’s been!  Lots of projects in the garden preparing for winter, and a million things to make for the holiday season!


And to add to all the chaos I brought home a young hen to add to our flock.  There were supposed to be 2 little hens, but one was killed by my Dad’s older hens.  So I was really cautious about integrating The Buffster, as we have come to call her.  She is a Buff Orpington, and we kind of just liked that as her name, so Buff for short.  This page is an excellent resource for integrating chickens.  Apparently some people just put the new hens in with their flock when they are sleeping, but my city chickens are pretty tough and much bigger than Buff.  I used the other two options, seperate spaces and caging the bullies.
 
Unfortunately the 2 quail that were living in the garden died a couple months ago, but I was able to use their old cage for Buff.  I set it up next to the chicken coop so all the chickens could see each other and get used to the changes. 


This is how the integration began:


Not horrible fighting, but lots of pecking and chasing.  It was mainly the #2 hen, Corn Flake, that would pick on the Buffster.  I seperated her from the others a couple times when she was out of control.  It was strange though, her aggression seemed to bump her up in the chain of command and now she is the Alpha Hen.  We gave them time together almost every day and let them scratch around the backyard where there was plenty of room for Buff to run away if she needed to. 


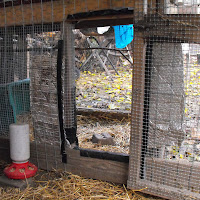
After about a week the older hens didn’t bother her much at all.  So it was time for full integration.   We decided to actually combine the 2 cages.  The original coop needed a bit of reinforcing to begin with.  Once everything was covered in small mesh chicken wire we lined the quail cage up next to the chicken coop with the doorway facing in towards the coop. 


We cut a matching doorway out of the side of the chicken coop by cutting a vertical line through the center, then horizontal cuts along the top and bottom of the door.  This allowed us to bend the cut chicken wire into the quail cage to secure the gap between the two cages.  We used gorilla tape around any sharp edges that we couldn’t bend smooth. 


The overall plan is to add a sunroof to the quail cage section using an old window pane.  We plan to use the top of the main part of the coop to catch rain water, store supplies or turn it into a green roof. 


Even though there was still a little pecking and fighting between hens at this point, we left them alone together to sort out their differences.  And they were fine!  It took another 2 or 3 days until the older chickens let Buff sleep in their house, but now they are one happy flock.


Here is one last addition I’ve made to the coop that has made a big difference.  I saw this idea here.  The purpose of the rocks is to keep the chickens from throwing hay and dirt into their water.  Basically I laid a couple logs down in the corner of the coop to close in a square section which I filled with rocks and bricks.  It’s not perfect but much cleaner.

Sunday, October 21, 2012

Jim Morrison Wall Art


It’s my amazing sister Holly’s birthday today!  I made her a huge Jim Morrison painting.  It turned out great; I really wanted to keep it for myself!  I think I will just have to do another one for us… maybe with Lux Interior instead?!  I basically just made a huge paper stencil and painting on canvas.


I made my own canvas with 24” and 32” stretcher bars and light tan canvas.  You could buy a pre-made canvas too, but it’s usually cheaper to make your own if it’s big painting. 


I took an image of Jim Morrison that was easy to recognize and decent quality so the basic details would show up in a stencil.  I used Gimp (a free, open source photo editor) to edit my picture.  I changed it to black and white then adjusted the levels, brightness and contrast of the photo until it was straight black and white.  Gimp also has a color option called Posterize (not sure what it’s called in Photoshop); where you can choose to only have 2 colors, black and white, in your image.  With these tools a stencil is easy.


Once I had my stencil I made the whole image the same size as my canvas and split it into 8.5” x 11” paper sized sections.  You will have to do some math for this part.  My image was going to need to be printed on 9 pieces of paper.  I made sure to overlap where I cut my image into sections, so that I could easily match the pieces up and wouldn’t miss any part of the image.


I printed each section out and then cut the border of the page off.  I assembled the image together and taped the paper with packaging tape on the front and back.  It may be helpful to print the whole image out on a separate piece of paper just so you have a model to look at.


(Also note that I printed my image in colors because I was out of black ink, but I will refer to the colored sections as black and the white as white to make it easier)


Now that you have your image, it’s time to make the stencil.  Cut the black spaces out with an X-Acto knife and scissors.  For any floating white spaces (as in not touching other white areas) you will need to keep a little “bridge” of black paper to keep it attached and make placement easy.  It may help to draw the “bridge” before cutting so you don’t make a mistake, as I have done many times with stencils!


Once all the black spaces are finally cut, pin the paper onto your canvas.  Take a permanent marker and outline around every line of the stencil. 


When you finish the overall outline you can go back through where you made the “bridges” and as you’re unpinning, draw in where the floating white pieces begin and end.  I drew a squiggly mark over those spots that would become black to make painting easier.


Now just color it in!  I used black silk screen ink with paint brushes, and then added a second coat of paint with a sponge for a smooth finish.  You could use acrylic paint too, but I wanted it to be flat and smooth like a giant silk screen.  I heat set the ink with an iron, although I’m not sure if it was necessary, but maybe it will help keep it from fading.


Such a large gift required a lot of wrapping paper, so I taped old phone book pages together and tucked the edges under the stretcher bars.  I even found her name in the listings and drew a heart around it as a gift tag.