Showing posts with label eggs. Show all posts

Friday, February 8, 2013

Preparing the Chickens for Winter


I should have posted this a few months ago, but towards the end of fall we started to winterize the chicken coop.  Our birds are pretty much out in the open so we needed to give them protection from the elements.  We tend to just work with what we have, which luckily is a lot of gardening equipment left from the previous owner.  So a few tarps, some PVC, recycling and lots of hay has gotten our chickens through the winter!

We covered the roof and two sides of the coop in a large tarp.  The back of our coop is also almost all covered, except for a 2 foot strip of chicken wire which has been left open for air flow.  The front side of the coop is also left open, and we have a large board that we can place in front of the coop for extremely cold or snowy nights.  Air flow is important because too much moisture in the coop can lead to frostbitten chickens!


We had issues in the beginning with water pooling up in the tarp flat across the roof.  So we rigged up a mini hoop house by feeding PVC pipe through the lattice roofing.  The rain and snow just slides right off and keeps the coop relatively dry.


The chickens sleep in this box, which has a wire floor.   Throughout the winter we keep the bottom layer full of hay.   I have to clean it almost daily, or every other day just to help keep the moisture out.  I just use a small shovel and clean it like a litter box, changing the hay out every week or as needed.  We put another tarp over the little house on extra cold nights, below 20° F.


We have also made few additions to the coop since they started laying eggs.  The nesting box is simply an old dog cage with 2 milk crates full of hay.  Works perfectly!


We hung their food bin from the roof which has kept it much cleaner.  I want to hang the water but I’m a little afraid of the weight. 


This is where the grit and oyster shells are.  Simply an old plastic sugar jug cut in half and stapled to the wall.


So far so good, all the chickens are healthy and happy.  And hopefully only another month or so of cold nights to get through!

Tuesday, November 13, 2012

Peanut Butter Dog Biscuits


I made a variation of these dog biscuits last Christmas for a few special dogs in my life.  All the dogs enjoyed them, as well as a couple of my friends who tested them for the pups :) They really are more of a peanut butter banana cracker, so these are approved for dogs and humans!


This recipe is super simple too, just mash up:


4 eggs

2/3 cup peanut butter

2 bananas


Mix in:


2 cups wheat flour

1 cup wheat germ

 
Until you have dough (you can see my pup waiting patiently in the background)


Then roll it out on a floured surface and cut your shapes out.  I found a dog bone cookie cutter at a craft store for about $0.75.


Put them on an oiled cookie sheet and bake for 30 minutes at 350°F.


Let cool and watch your dog devour them!

Saturday, November 10, 2012

Chicken Coop Addition and the Adventures of Integrating a New Hen


What a busy month it’s been!  Lots of projects in the garden preparing for winter, and a million things to make for the holiday season!


And to add to all the chaos I brought home a young hen to add to our flock.  There were supposed to be 2 little hens, but one was killed by my Dad’s older hens.  So I was really cautious about integrating The Buffster, as we have come to call her.  She is a Buff Orpington, and we kind of just liked that as her name, so Buff for short.  This page is an excellent resource for integrating chickens.  Apparently some people just put the new hens in with their flock when they are sleeping, but my city chickens are pretty tough and much bigger than Buff.  I used the other two options, seperate spaces and caging the bullies.
 
Unfortunately the 2 quail that were living in the garden died a couple months ago, but I was able to use their old cage for Buff.  I set it up next to the chicken coop so all the chickens could see each other and get used to the changes. 


This is how the integration began:


Not horrible fighting, but lots of pecking and chasing.  It was mainly the #2 hen, Corn Flake, that would pick on the Buffster.  I seperated her from the others a couple times when she was out of control.  It was strange though, her aggression seemed to bump her up in the chain of command and now she is the Alpha Hen.  We gave them time together almost every day and let them scratch around the backyard where there was plenty of room for Buff to run away if she needed to. 


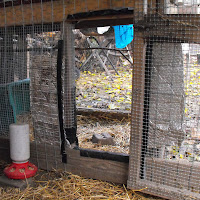
After about a week the older hens didn’t bother her much at all.  So it was time for full integration.   We decided to actually combine the 2 cages.  The original coop needed a bit of reinforcing to begin with.  Once everything was covered in small mesh chicken wire we lined the quail cage up next to the chicken coop with the doorway facing in towards the coop. 


We cut a matching doorway out of the side of the chicken coop by cutting a vertical line through the center, then horizontal cuts along the top and bottom of the door.  This allowed us to bend the cut chicken wire into the quail cage to secure the gap between the two cages.  We used gorilla tape around any sharp edges that we couldn’t bend smooth. 


The overall plan is to add a sunroof to the quail cage section using an old window pane.  We plan to use the top of the main part of the coop to catch rain water, store supplies or turn it into a green roof. 


Even though there was still a little pecking and fighting between hens at this point, we left them alone together to sort out their differences.  And they were fine!  It took another 2 or 3 days until the older chickens let Buff sleep in their house, but now they are one happy flock.


Here is one last addition I’ve made to the coop that has made a big difference.  I saw this idea here.  The purpose of the rocks is to keep the chickens from throwing hay and dirt into their water.  Basically I laid a couple logs down in the corner of the coop to close in a square section which I filled with rocks and bricks.  It’s not perfect but much cleaner.

Monday, June 18, 2012

Chickens!!!


This weekend was very busy, and amidst the craziness my 3 chickens were finally ready to be picked up!  We aren’t sure what breed they are exactly, because they were hatched by someone’s wild backyard flock, but they sure are adorable!  Luckily the guys I garden with already built a coop out of one of our hoop houses we took down, plus some scrap furniture found around the neighborhood (if only I had been home to take pictures of their process!).  So far it’s holding up just fine and the chickens are happy! 


I will be posting more about our chickens as we learn more and start incorporating them into our gardening.  We still have several months before they start laying eggs, so right now we are just trying to get them comfortable in their new habitat and making sure they are totally safe from raccoons and other predators.   I’m so excited to learn how to raise chickens and start this new adventure!