Showing posts with label organic gardening. Show all posts

Friday, April 19, 2013

Preparing the Garden for 2013

Well we have been insanely busy down here in the Maketewah Valley.  This year my boyfriend and I are working at 3 different garden spots in the neighborhood, with help from some friends too!  It's been rather tough working full time, and spending every free hour of sunlight digging and turning beds!  I’m worn out, but the big projects are done!  Here is a brief overview on what we’ve been doing…..
One of gardens is in a friend’s yard down the block, just a big grassy backyard; perfect for bigger plants that need more water (easy access to a hose).  We dug a few beds out last year, but this year we made them larger and used the cut strips of sod to build up a natural border.  Added compost and leaf mold so they are ready! 
The border will be nice so we can keep building up that soil.  The two long beds in the back grew our corn, beans, gourds and amaranth last summer; but this year I’m trying tobacco! More about that later :)  The huge bed adjacent to the tobacco beds will be full of peppers and okra.  We threw some peas in for now; they should be about done by the time the peppers are going in.

At our house we are starting lots of seeds. 
Everything is doing great!  We have a small hoop house for starting seeds and storing tools.  We set up a heater a couple nights last month when the temperature dropped below freezing, but for the most part the hoop house stayed warm enough.

Here is a look inside….
We put our seedlings in tubs with glass or plastic bags over them to keep everything warm and moist.   Now that the temperature is rising, we remove the covers in the morning otherwise the seedlings will get fried. 
We used these old metal storage containers to hold planters and then wrapped a large trash bag around them at night.
My boyfriend started some basil in these 2 liter bottles.  Just cut them in half, add water and a cotton “wick” and plant.  Seem to be working out so far, and you don’t have to worry about watering.
For this large, floating tobacco tray we just set up scrap wood barriers with glass and plastic on top.; which worked perfectly for starting greens.


Our compost piles....
We have been having beautiful weather here, so we took this opportunity to turn our compost piles.  We have two big piles and two small ones, so we started with the bigger pile.  Fork it up, then turned the adjacent pile into the first pile.  Once we got all the stuff that was still decomposing turned into the first pile; we collected the pure, worm filled compost in plastic tubs and trash cans.
The plan is to let the compost dry out in these tubs over the summer.  The tubs and trash cans are pretty deep so we will have to mix them up so the compost dries evenly.  Drying the compost makes it easier to work with.  Rather than adding a handful of compost mush to your soil, you’re adding dry compost mulch that easily forks into the soil and spreads evenly.
We covered the tubs in plastic bags to keep the rain out, and we will go from there this summer.  We turned the smaller compost piles onto the large pile.  Now we have one huge pile that is close to being done.  The chickens get to scratch around in this pile; turning it up, eating bugs and pooping all over making our compost into gold!  We throw our food scraps in the smaller piles, layering it with yard waste and old hay from the chicken coop.  Another benefit of having our compost organized in various stages of decomposition is that we don’t have to worry about the chickens eating things they shouldn’t out of the food scraps, like egg shells and avocado skins.  Dirty work, but the plants will thank us later!

Winter rye was planted all over last fall as a cover crop. So we turned it all over and added leaf mold and compost to prepare those beds. Took a bit of work, but the soil looks beautiful and ready to go. 
We also rolled all the plastic off our hoop houses, so the garden is ready for spring and summer.  Currently we have peas, onions, greens and lettuces planted.  The fruit trees are blooming, all our perennial herbs are coming back and the seedlings are growing strong.  This year looks very promising! 


Tuesday, March 19, 2013

DIY Natural A-Frame Trellis Part 1

Today my boyfriend and I started making trellises for our peas, cucumbers, gourds and melons.  We had an abundance branches from cut trees.  So we dug through the pile of tree limbs matching similar size branches. 
Basically we started with a tripod.  Taking 3 branches and anchoring them together using the natural notches in the stick to lock them in place.  We wound the thickest jute I could find around the sticks, wrapping tightly and knotting in multiple places. 
We built 2 tripods close to the same height.  Then put a long, relatively straight beam across the tripods giving us a well supported a-frame.   We tied the center beam down, although it didn’t seem necessary because they are pretty sturdy as they are.
We made a couple for the house garden, and 3 others to take to our other gardens in the neighborhood.  We tied them up in little bundles so we can carry them easily and remember which branches go together.  It seems to be easier to set the frame up on site, rather than carry tripods.  Once you have some branches picked out it really only takes about 15 minutes to put together. 
And best of all these trellises are all natural and biodegradable, just compost or burn when you’re done.  We haven’t decided what to put across the sides to encourage the plants to grow up the frame.  Wire fencing, bird netting, or jute is what we are debating. Jute will work for peas and possibly for cucumbers if strung in a grid, but that will be figured out in Part 2.

Friday, February 8, 2013

Preparing the Chickens for Winter


I should have posted this a few months ago, but towards the end of fall we started to winterize the chicken coop.  Our birds are pretty much out in the open so we needed to give them protection from the elements.  We tend to just work with what we have, which luckily is a lot of gardening equipment left from the previous owner.  So a few tarps, some PVC, recycling and lots of hay has gotten our chickens through the winter!

We covered the roof and two sides of the coop in a large tarp.  The back of our coop is also almost all covered, except for a 2 foot strip of chicken wire which has been left open for air flow.  The front side of the coop is also left open, and we have a large board that we can place in front of the coop for extremely cold or snowy nights.  Air flow is important because too much moisture in the coop can lead to frostbitten chickens!


We had issues in the beginning with water pooling up in the tarp flat across the roof.  So we rigged up a mini hoop house by feeding PVC pipe through the lattice roofing.  The rain and snow just slides right off and keeps the coop relatively dry.


The chickens sleep in this box, which has a wire floor.   Throughout the winter we keep the bottom layer full of hay.   I have to clean it almost daily, or every other day just to help keep the moisture out.  I just use a small shovel and clean it like a litter box, changing the hay out every week or as needed.  We put another tarp over the little house on extra cold nights, below 20° F.


We have also made few additions to the coop since they started laying eggs.  The nesting box is simply an old dog cage with 2 milk crates full of hay.  Works perfectly!


We hung their food bin from the roof which has kept it much cleaner.  I want to hang the water but I’m a little afraid of the weight. 


This is where the grit and oyster shells are.  Simply an old plastic sugar jug cut in half and stapled to the wall.


So far so good, all the chickens are healthy and happy.  And hopefully only another month or so of cold nights to get through!

Wednesday, December 5, 2012

Reusable tea and herb bags


I made a batch of muslin tea bags for a few people for Christmas.  As I’m growing more herbs, I need to make more tea!  So I figured I could fill a couple bags with my own hyssop tea from the garden and through in some extra tea bags for a sweet, green gift.

A ½ yard of 44 inch wide unbleached, preshrunk muslin made 24 tea bags.  I also bought 10 yards of cotton string that is used in making some type of fancy curtain (available at fabric stores).  But you could use any natural fiber string.

I cut my muslin into rectangle pieces measuring 6 x 4 inches, and I cut my string in to 12-15 inch pieces.


Press in half and trim edges with picking shears to prevent fraying.


Press the 2 short sides in about a ¼ inch.


Press one long side in about ½ inch.


Place your cotton string inside the hem line and sew across the top, creating a pocket for the pull string.


Fold the rectangle in half again, with seams facing out.  Stitch along the side and bottom to form a bag.


Clip your corners, clean off any hairs or stray threads, and turn right-side out. Tie the cotton string together and make yourself a cup of tea!


After finishing these, I bought another half yard and made 6 larger bags for storing/drying herbs and spices (I followed the directions above, but used 9 x 14 inch rectangles and 18 inch pieces of string).  You can make the bags as big or small as you want.  Larger bags also work for compost tea!


When doing small, repetitive projects like this it often works best to do it assembly line style.  I cut everything out, then do all the ironing, sew each bag, clean them up and package.  It goes much quicker!

Saturday, November 10, 2012

Chicken Coop Addition and the Adventures of Integrating a New Hen


What a busy month it’s been!  Lots of projects in the garden preparing for winter, and a million things to make for the holiday season!


And to add to all the chaos I brought home a young hen to add to our flock.  There were supposed to be 2 little hens, but one was killed by my Dad’s older hens.  So I was really cautious about integrating The Buffster, as we have come to call her.  She is a Buff Orpington, and we kind of just liked that as her name, so Buff for short.  This page is an excellent resource for integrating chickens.  Apparently some people just put the new hens in with their flock when they are sleeping, but my city chickens are pretty tough and much bigger than Buff.  I used the other two options, seperate spaces and caging the bullies.
 
Unfortunately the 2 quail that were living in the garden died a couple months ago, but I was able to use their old cage for Buff.  I set it up next to the chicken coop so all the chickens could see each other and get used to the changes. 


This is how the integration began:


Not horrible fighting, but lots of pecking and chasing.  It was mainly the #2 hen, Corn Flake, that would pick on the Buffster.  I seperated her from the others a couple times when she was out of control.  It was strange though, her aggression seemed to bump her up in the chain of command and now she is the Alpha Hen.  We gave them time together almost every day and let them scratch around the backyard where there was plenty of room for Buff to run away if she needed to. 


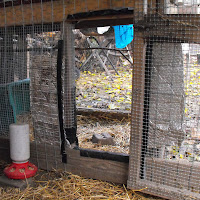
After about a week the older hens didn’t bother her much at all.  So it was time for full integration.   We decided to actually combine the 2 cages.  The original coop needed a bit of reinforcing to begin with.  Once everything was covered in small mesh chicken wire we lined the quail cage up next to the chicken coop with the doorway facing in towards the coop. 


We cut a matching doorway out of the side of the chicken coop by cutting a vertical line through the center, then horizontal cuts along the top and bottom of the door.  This allowed us to bend the cut chicken wire into the quail cage to secure the gap between the two cages.  We used gorilla tape around any sharp edges that we couldn’t bend smooth. 


The overall plan is to add a sunroof to the quail cage section using an old window pane.  We plan to use the top of the main part of the coop to catch rain water, store supplies or turn it into a green roof. 


Even though there was still a little pecking and fighting between hens at this point, we left them alone together to sort out their differences.  And they were fine!  It took another 2 or 3 days until the older chickens let Buff sleep in their house, but now they are one happy flock.


Here is one last addition I’ve made to the coop that has made a big difference.  I saw this idea here.  The purpose of the rocks is to keep the chickens from throwing hay and dirt into their water.  Basically I laid a couple logs down in the corner of the coop to close in a square section which I filled with rocks and bricks.  It’s not perfect but much cleaner.

Saturday, October 20, 2012

Drying Peppers


This year I grew a bunch of peppers I’d never grown before.   I usually just make hot sauces or use fresh peppers in my cooking.  For hot sauces I will freeze peppers as they ripen until I have enough for a decent amount of sauce.  But to fully utilize my Alma Paprika and Joe’s Long Cayenne Peppers I needed to dry them.  I learned that not all peppers dry the same, so I used two different methods. 
 
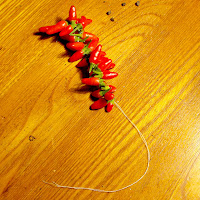
I also dried some of my Thai Hot Peppers, because they are small and perfect for throwing into soups, pastas, curries, etc.  So for the Thai Hot and Joe’s Long Cayenne Peppers, I simply strung the peppers through their stems on cording.  I used sewing thread for the small peppers and yarn/hemp for the larger peppers.  You can tie a bead or large knot on the bottom of the string to keep the peppers from sliding off as they shrivel up.
 
 
I let the smaller peppers touch each other, but for the cayenne peppers I tied a knot every 3 inches or so after each stem to keep them dry and separated. 


Hang the strung peppers in a sunny window.  I just put a couple nails at the top of my window sill and hung the peppers from there.  You can hang them outside, but if it rains and the peppers get moist they will rot or mold.  At first I put the nails on the outside of the window sill, but I kept forgetting to bring the peppers in now that it’s finally raining again!


I had trouble with my paprika peppers; my first harvest rotted when I tried to hang them.   I’ve been dehydrating the rest in my oven.  I slice the peppers and spread them onto a baking sheet.


Then bake them on the lowest setting for several hours until all the moisture cooks out. 


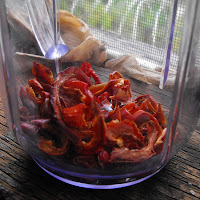
I ground them up in a blender and made Paprika!  It smells and tastes amazing, I’m going to use it in a potato salad for this weekend.
 
I’m still waiting for the cayenne peppers to dry completely so I can grind them up too; I can’t wait because I love cayenne powder.  One of my favorites is to add it to Alfredo sauce for spicy Alfredo!  I throw a little cayenne in everything to add some spice!

Monday, October 1, 2012

Saving Tomato Seeds


Saving tomatoes seeds is easy.  In the past I have just scooped out seed and let them dry and had no major problems.  However the seeds stick together and can easily mold.  So this method below involves fermenting and guarantees that your seeds will be clean and disease free.


I like to start saving seeds right after I pick the tomatoes and I’m about to cook with them.  Cut the tomato in half and simply scoop out the seeds into a cup labeled with the tomato variety. 


Fill the seed cup half way full of water and wrap plastic over the top. I reused a plastic bag from plastic plates or cups. Poke holes in the plastic for air flow and sit the cup on a windowsill.


Stir the seeds a couple times over the next 3 days. You will see a layer of scum on top of the water and your seed will be on the bottom. Scrape the scum off and strain your seeds out. I used my plastic wrap to strain the seeds then let them air dry on top.


Once they are completely dried put them in a paper packet and don’t forget to label with the tomato variety and date (we’ve made a few mistakes not labeling correctly!).