Showing posts with label plants. Show all posts

Friday, April 19, 2013

Preparing the Garden for 2013

Well we have been insanely busy down here in the Maketewah Valley.  This year my boyfriend and I are working at 3 different garden spots in the neighborhood, with help from some friends too!  It's been rather tough working full time, and spending every free hour of sunlight digging and turning beds!  I’m worn out, but the big projects are done!  Here is a brief overview on what we’ve been doing…..
One of gardens is in a friend’s yard down the block, just a big grassy backyard; perfect for bigger plants that need more water (easy access to a hose).  We dug a few beds out last year, but this year we made them larger and used the cut strips of sod to build up a natural border.  Added compost and leaf mold so they are ready! 
The border will be nice so we can keep building up that soil.  The two long beds in the back grew our corn, beans, gourds and amaranth last summer; but this year I’m trying tobacco! More about that later :)  The huge bed adjacent to the tobacco beds will be full of peppers and okra.  We threw some peas in for now; they should be about done by the time the peppers are going in.

At our house we are starting lots of seeds. 
Everything is doing great!  We have a small hoop house for starting seeds and storing tools.  We set up a heater a couple nights last month when the temperature dropped below freezing, but for the most part the hoop house stayed warm enough.

Here is a look inside….
We put our seedlings in tubs with glass or plastic bags over them to keep everything warm and moist.   Now that the temperature is rising, we remove the covers in the morning otherwise the seedlings will get fried. 
We used these old metal storage containers to hold planters and then wrapped a large trash bag around them at night.
My boyfriend started some basil in these 2 liter bottles.  Just cut them in half, add water and a cotton “wick” and plant.  Seem to be working out so far, and you don’t have to worry about watering.
For this large, floating tobacco tray we just set up scrap wood barriers with glass and plastic on top.; which worked perfectly for starting greens.


Our compost piles....
We have been having beautiful weather here, so we took this opportunity to turn our compost piles.  We have two big piles and two small ones, so we started with the bigger pile.  Fork it up, then turned the adjacent pile into the first pile.  Once we got all the stuff that was still decomposing turned into the first pile; we collected the pure, worm filled compost in plastic tubs and trash cans.
The plan is to let the compost dry out in these tubs over the summer.  The tubs and trash cans are pretty deep so we will have to mix them up so the compost dries evenly.  Drying the compost makes it easier to work with.  Rather than adding a handful of compost mush to your soil, you’re adding dry compost mulch that easily forks into the soil and spreads evenly.
We covered the tubs in plastic bags to keep the rain out, and we will go from there this summer.  We turned the smaller compost piles onto the large pile.  Now we have one huge pile that is close to being done.  The chickens get to scratch around in this pile; turning it up, eating bugs and pooping all over making our compost into gold!  We throw our food scraps in the smaller piles, layering it with yard waste and old hay from the chicken coop.  Another benefit of having our compost organized in various stages of decomposition is that we don’t have to worry about the chickens eating things they shouldn’t out of the food scraps, like egg shells and avocado skins.  Dirty work, but the plants will thank us later!

Winter rye was planted all over last fall as a cover crop. So we turned it all over and added leaf mold and compost to prepare those beds. Took a bit of work, but the soil looks beautiful and ready to go. 
We also rolled all the plastic off our hoop houses, so the garden is ready for spring and summer.  Currently we have peas, onions, greens and lettuces planted.  The fruit trees are blooming, all our perennial herbs are coming back and the seedlings are growing strong.  This year looks very promising! 


Tuesday, March 19, 2013

DIY Natural A-Frame Trellis Part 1

Today my boyfriend and I started making trellises for our peas, cucumbers, gourds and melons.  We had an abundance branches from cut trees.  So we dug through the pile of tree limbs matching similar size branches. 
Basically we started with a tripod.  Taking 3 branches and anchoring them together using the natural notches in the stick to lock them in place.  We wound the thickest jute I could find around the sticks, wrapping tightly and knotting in multiple places. 
We built 2 tripods close to the same height.  Then put a long, relatively straight beam across the tripods giving us a well supported a-frame.   We tied the center beam down, although it didn’t seem necessary because they are pretty sturdy as they are.
We made a couple for the house garden, and 3 others to take to our other gardens in the neighborhood.  We tied them up in little bundles so we can carry them easily and remember which branches go together.  It seems to be easier to set the frame up on site, rather than carry tripods.  Once you have some branches picked out it really only takes about 15 minutes to put together. 
And best of all these trellises are all natural and biodegradable, just compost or burn when you’re done.  We haven’t decided what to put across the sides to encourage the plants to grow up the frame.  Wire fencing, bird netting, or jute is what we are debating. Jute will work for peas and possibly for cucumbers if strung in a grid, but that will be figured out in Part 2.

Sunday, November 25, 2012

Dad’s B-Day Gift – Crushed Red Pepper Flakes and Seeded Rye Crackers


For my Dad’s birthday this year I put together a jar of my homegrown crushed cayenne peppers and these seeded rye crackers with amaranth, sunflower seeds and fennel from the garden. 


My dad like’s spicy food, so I figured he could get some use out of my peppers!  Here is my post about drying the peppers, and then I simply crushed the dried peppers up a mortar and pestle until they were nothing more than seeds and pepper flakes.  So good!


This was my first time making crackers.  I didn’t have much wheat flour left, but I had a whole thing of rye flour.  I followed this recipe as my base and added seeds and more rye flour.  My adjusted recipe goes as follows:

½ CUP plus 2 TBSP rice milk
3 TBSP olive oil
1 CUP whole wheat flour
1 CUP rye flour
½ TSP baking powder
1 TSP garlic salt
2 TSP amaranth seeds
¼ CUP sunflower seeds
1 TBSP fennel seeds

 
Mix the milk and oil together.

Add the rest of the ingredients and mix until dough is formed.

Roll out on a floured surface and cut into cracker shapes (either into squares or use a cookie cutter).  I flattened the dough to about 1 cm, but you could make thicker crackers too, just cook a little longer.


Place the crackers on parchment paper lined baking sheets and cook for 18 minutes at 350°F, rotating about half way through.


They taste great!  My dad will love them.  I put my goods in glass jars and made a couple personal labels using sticker paper and permanent markers.


(I grew Joe's Long Cayenne Pepper's; I crossed the "E" in Joe's out and put a "Y" above to spell my name, Joy :) )

Thursday, November 22, 2012

Stuffed Tofurkey


I’ve been vegetarian for over 10 years now and I’ve never made a tofurkey!  So I figured it was about time.  I looked at a bunch of different recipes, combining several but mostly followed this one; it has great pictures of each step.  It’s also an easy recipe to adapt depending on what herbs you have available.


This is a bit of a process, but after tasting the results I may be making it every year!


Basically you are making 3 parts; the “turkey”, stuffing and a marinade.  I started 2 days before Thanksgiving, because I had to drive to Columbus this morning, but you can make it work starting the day before.  And if you’re already out of time, there is always this fabulous beer can tofurkey idea!


TOFURKEY

INGREDIENTS:
3-4 14 oz containers of extra firm tofu
1-2 TBSP of each of the following herbs:
   Oregano
   Sage
   Rosemary
   Thyme
   Garlic Scapes (/Chives/Green Onions)
Salt and Pepper to taste


Let the tofu sit out overnight or at least a few hours so it’s at room temperature. 


With your hands, squeeze all the liquid you can get out of the tofu.  Then mix in the remaining ingredients.


Take a clean, wet piece of cheesecloth and drape it over a strainer.  I sprinkled some rosemary and chopped sage leaves down first.  Then scoop the tofu mix into the covered strainer.  Use the excess cheesecloth to wrap the top of the tofu and press any liquid out.  Put a bowl under the strainer and a plate on top of the cloth.  Sit in the fridge overnight and place something heavy (I used a juice bottle) on top of the plate so that the presser will continue to squeeze liquid out of the tofurkey. 


STUFFING

You can make this the day of your meal or before and refrigerate.

INGREDIENTS:
3 CUPS bread cubes
1 TSP or so olive oil
1 small red onion, finely diced
1 celery stick, finely diced
1 small apple, diced
3 TBSP herbs (I used sage, cilantro, rosemary and thyme)
Pinch of cayenne (crushed red pepper)
Salt and pepper to taste
1 TBSP maple syrup
1 TSP balsamic vinegar
½ CUP sunflower seeds or other nut/seed
¼ CUP dried fruit (I used dried goji berries from the garden but you can use cherries, cranberries, etc.)
½ CUP vegetable broth

 
First cut the bread into cubes and dry in the over for 20 minutes or so at 250°F.

 
Heat a pan with a little olive oil and sauté the onion for a few minutes until soft.

 
Add celery, cook another 2 minutes

 
Add apple, herbs and spices and cook 5 more minutes.

 
Add syrup and balsamic vinegar, mix and remove from heat.

 
Combine this mixture with the dried bread cubes, seeds and dried fruit.

 
Put the stuffing into a greased pan and pour the vegetable broth over the top.
 

Cover with foil and bake for 25 minutes at 300°F.


MARINADE

I also made the marinade the day before and let it soak in all the flavors.

 
INGREDIENTS:
¼ CUP Braggs (/soy sauce/tamari)
¼ CUP olive oil
½ CUP chopped herbs (I used sage, chives, rosemary, thyme, oregano, and parsley)
1 TSP sesame seeds, finely chopped
1-2 cloves garlic, finely chopped


Just mix everything together and keep in the refrigerator.


ASSEMBLY….


Scoop out the center of the tofurkey, leaving an inch or so on the sides.


Fill hole with stuffing, and recover with scooped out tofu.  


Then very carefully flip the whole tofurkey into a cooking pan (I just sort of picked up the whole cheesecloth, placed the baking pan on top of the tofu and flipped).


Baste with the marinade, and cook for 1 to 1 ½ hours at 350°F.  Baste the tofurkey as much as you want throughout the baking.


I had some extra stuffing, so I reheated it separately and added it in around my tofurkey!

 
Beautiful and tastes amazing!  Much better than eating something this cute…..
 

Saturday, October 20, 2012

Drying Peppers


This year I grew a bunch of peppers I’d never grown before.   I usually just make hot sauces or use fresh peppers in my cooking.  For hot sauces I will freeze peppers as they ripen until I have enough for a decent amount of sauce.  But to fully utilize my Alma Paprika and Joe’s Long Cayenne Peppers I needed to dry them.  I learned that not all peppers dry the same, so I used two different methods. 
 
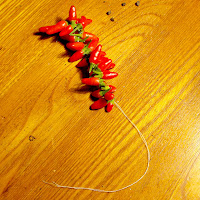
I also dried some of my Thai Hot Peppers, because they are small and perfect for throwing into soups, pastas, curries, etc.  So for the Thai Hot and Joe’s Long Cayenne Peppers, I simply strung the peppers through their stems on cording.  I used sewing thread for the small peppers and yarn/hemp for the larger peppers.  You can tie a bead or large knot on the bottom of the string to keep the peppers from sliding off as they shrivel up.
 
 
I let the smaller peppers touch each other, but for the cayenne peppers I tied a knot every 3 inches or so after each stem to keep them dry and separated. 


Hang the strung peppers in a sunny window.  I just put a couple nails at the top of my window sill and hung the peppers from there.  You can hang them outside, but if it rains and the peppers get moist they will rot or mold.  At first I put the nails on the outside of the window sill, but I kept forgetting to bring the peppers in now that it’s finally raining again!


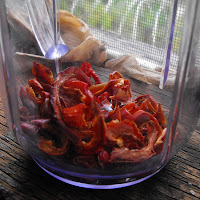
I had trouble with my paprika peppers; my first harvest rotted when I tried to hang them.   I’ve been dehydrating the rest in my oven.  I slice the peppers and spread them onto a baking sheet.


Then bake them on the lowest setting for several hours until all the moisture cooks out. 


I ground them up in a blender and made Paprika!  It smells and tastes amazing, I’m going to use it in a potato salad for this weekend.
 
I’m still waiting for the cayenne peppers to dry completely so I can grind them up too; I can’t wait because I love cayenne powder.  One of my favorites is to add it to Alfredo sauce for spicy Alfredo!  I throw a little cayenne in everything to add some spice!

Friday, September 7, 2012

Chunky Ketchup Sauce


I’ve wanted to make ketchup for awhile now and we have so many cherry tomatoes!  We put them in everything; salads, pizzas, sandwiches, wraps, eggs, bread and we still can’t keep up with the garden!  So I went out and collected every ripe cherry tomato we had (mostly Peacevine Cherrys, which have been awesome!), plus all the Casady's Follys.  Also known as psychedelic tomatoes, and while they look beautiful; they just don’t have that juicy, flavorful bite that I love in tomatoes.  But I figured they would still be good in ketchup!
 
I used this recipe as my base, changing it slightly by adding more spices and sugar instead of agave since I didn’t have any.  This ketchup is amazing!  It’s not the super sugary, corn syrup filled ketchup we are used to in the US.  It reminds me of the ketchup in Europe, a more naturally sweet tomato sauce, only it’s chunky because you leave the skins on.  They soften up enough while cooking them, adding extra flavor, texture and nutrients!
 

I learned a good rule of thumb the other day for measuring produce.  1 pound equals 3 medium apples.  I figured I had a little over 2 pounds of tomatoes.  I pulled the stems off the tomatoes and sliced the bigger ones into chucks.  I threw them all in a pan, added enough olive oil to coat them and roasted them until they were tender.
 

I put them through a food processor, blending till smooth and returning the mixture back to the pan. I added:

1 tbsp white sugar
4 tbsp apple cider vinegar
1 tbsp brown sugar
5 cloves garlic chopped finely
1 tbsp or so dried basil
1 tbsp or so dried oregano
1 tbsp cayenne pepper powder
1 tbsp turmeric
1 tsp cinnamon
Sea salt and pepper


Then cook the sauce over medium heat for half an hour or so, stirring occasionally, until the sauce thickens up to the consistency you like.  Put it in a Mason jar and store in your refrigerator.  I assume you could process it too, just like you would pasta sauce, but I knew this batch wouldn’t last long enough to need that!


With all the work of making homemade ketchup I had to make some fries to go with it.  Making your own fries is so easy, it just takes a while.  I just slice up a couple potatoes into fry shape.  Throw them in a bowl and coat with oil.  Then add spices… I like to add sea salt, pepper, garlic powder, cayenne pepper.  My boyfriend is from Maryland, so he always adds Old Bay spices, and here in Cincinnati we add Grippos bbq spice… there are many ways to spice up fries. 
 
Toss your potatoes in the oil and spices, spread them on a baking tray and cook at 400° until they are crispy and golden brown, flipping them occasionally.  When I first went vegetarian I ate way too many fries!  But when you make them yourself with fresh ketchup from the garden, they’re not soo bad :)

Monday, September 3, 2012

Cotton


Growing Cotton

While looking through seed catalogs last winter I stumbled upon a cotton section in the Southern Exposure catalog.  I had never thought about growing cotton before, but as a hard core crafter I really wanted to try it out.  I bought a pack Red Foliated White Cotton; I got 18 plants out of the 20 seeds!  I started the seeds in small trays.  They quickly sprouted up and outgrew the trays. 

This is the size they were when I transplanted them outside in early May. I read that may people plant cotton in groups of 3. As a sort of experiment I put 3 plants in a pot and left them in the hoop house for the spring and summer. This proved to not be so great, because the cotton did not flower and produce as well. I moved the pot outside several weeks ago though and they started to look better.

 
The other 15 plants were planted in the ground at a neighbor’s house. One thing I never realized about cotton is that the flowers are beautiful! Unfortunately I didn’t take a picture early enough, but soon after they reach this height, large white flowers open up, and then they turned a dark red.


After the flowers finish blooming, this big alien looking bulbs grows. At this stage the plants started drooping a bit from the weight of the bulbs. I tied the groups of 3 plants together with a stake in one side to give them some support. I didn’t want a single precious branch to break!


Towards the end of the summer the bulb dries up, and opens to reveal puffs of cotton! With my tiny plot of cotton, I am able to collect pods here and there once they open to this level.


Now for the harvest

There were 5 puffs of cotton in each pod, and 5 to 6 seeds in each puff. So I pulled the cotton out and separated all the seeds with my fingers.


This how much cotton I got from only 2 pods, plus I now have about 50 seeds, and 2 really cool looking pod husks (not sure what I will do with them yet!). And there are many more pods that should open up in the next few weeks.


I still haven’t decided what I will do with my cotton either. I can’t think of much use for cotton balls, I thought maybe q-tips. I’d like to try spinning it into thread, better yet fabric, but thread seems a bit more doable this year. I’ve been trying to figure out how to make a spinner, so check back soon for more information on that!